I managed to somehow lose the root password for the vCenter Server Appliance in my home lab – I had the documentation and I know the password has worked in the past, but it had been a while since I had to log in to the shell.  I managed to reset it using the following:

Download openSUSE Rescue CD (I used x64 version 13.1) – Link

Set the VM to boot from the CD and it will load – select openSUSE from the boot menu, then at the login screen change the user to root.  The password is blank.

Load X Terminal and type:

mount /dev/sda3 /mnt
cd /mnt
cp shadow shadow-bak
chmod +w shadow
vi shadow

Find the line for root and change the encrypted password to:

$6$KZ4N.p6e$bFJsFru19eVPiYvIEsTvVAtdGK/bx/ap5j8yl2e21L2VHyd/KVQf4qRQVKtfVRHyNVkbfgq07KlMkzvOcnO8D1

Note – if copy/pasting to the VM won’t work (common in VMs with no VMware tools loaded), type the following to set the password in the live/rescue CD session:

passwd
Password prompt: vmware
Re-enter Password: vmware
vi /etc/shadow

Copy the password against the root user, quit then edit /mnt/etc/shadow and enter the new encrypted password in there.

The complete line should look like:

root:$6$KZ4N.p6e$bFJsFru19eVPiYvIEsTvVAtdGK/bx/ap5j8yl2e21L2VHyd/KVQf4qRQVKtfVRHyNVkbfgq07KlMkzvOcnO8D1:15976:0:90:7:::

Reboot the VM (don’t forget to eject the CD), then login with username of root and password vmware 🙂

Account Past Expiry Date

There is also a chance the password has expired and needs changing – only you can’t log in to change it.  Boot to the rescue live CD as above and mount /dev/sda3 into /mnt, and edit the /mnt/etc/shadow file – find the same line for root and if the encrypted password has an ‘x’ as the first character then the password has expired.  Simply remove the ‘x’ and change the ’90’ which appears later in the line signifying 90 days since the password was last changed to ‘9999’, save and reboot.  See the screenshot below:
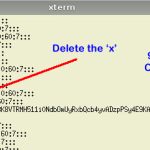
VCSA-Expired-Password

HP MicroServer G7 N54L

I recently bought an HP MicroServer N54L to add to the home lab along with 8GB RAM (single DIMM).  Immediately I installed ESXi 5.5 and deployed the VMware vCenter Server Appliance (Linux based appliance – instead of going the conventional route and installing Windows and vCenter Server).  To my surprise it was configured to use 8GB RAM by default, which is less than ideal – leaving me with 0MB free!  I know it is possible to reduce the amount of memory required by vCenter under Windows by reducing the Java heap settings.  A quick Google revealed how to reduce RAM consumption for version 5.1 of the appliance which forms the basis of the changes, but there are a few more settings to change as well.  As this deployment is only going to have 2 or 3 low powered ESXi hosts I wanted to find out how low I could get the allocated RAM.  I am currently running it at 3GB More »

I recently had this error ” This OVF package uses features that are not supported when deploying directly to an ESX host.  The OVF package requires support for OVF Properties.  Detils: Line 614: Unsupported element: ‘Property’ ” when trying to deploy NetApp’s Data ONTAP Edge 8.1.1 Evaluation to my ESXi 5.1 host.

The fix is easy and is described in the error message: deployment is not supported directly to an ESXi host – you must deploy through vCenter.  A pain if you don’t have vCenter installed, but unfortunately this is the only fix.

More »

After my lack of success with FREESCO, I am still on the hunt for a decent lightweight router to run in ESXi to simulate a branch office scenario for my lab.  I looked at IPCop which looks like it would do the job, but it was 61MB.  Similarly PFSense looks very good, but not at over 100MB.  I then started my search again and I don’t know how I missed it – m0n0wall, 9MB.  This is much more like it:

Download the image generic-pc-vm from here

Copy to your datastore and register the VM.  I had to remove the included NICs and add my own.  As my goal is to route between 2 subnets, add 3 NICs (host only, or whatever, depending on what you are trying to achieve).

Boot the VM and in the console you need to go through the menu to designate your NICs.  You need a WAN interface, so I designated them as follows:

TypeNICESXi NIC Type
LANem1VM Network - used for management
WANem0Host Only
OPT1em2Host Only
OPT2em3Host Only

You can do this by going through option 1 on the menu and setting VLANs if appropriate, or just press enter and it will skip to NIC designation.

Then you need to set an IP address on your LAN interface, so choose option 2 and set an IP address you can reach from your LAN, then you can http://x.x.x.x to the IP address and login with ‘admin’ and ‘mono’

I was looking for a virtual router for VMware ESXi for my home lab and I came across FREESCO – a nice lightweight very simple to use linux router on a floppy disk.  No worries for all you command-line-ophobes, it is managed via a web GUI.


Download: http://www.screencast.com/users/esloof/folders/FREESCO/

Instructions 1

Instructions 2


Update – this looked so promising but I received errors on booting and never got it working at all.  I tried the latest floppy image from sourceforge, but the same – no joy, so I looked for an alternative: m0n0wall

I found this handy tip on the VMWare Community Forum when suffering from a jerky mouse and screen draw:

The VMWare tools is not installing the correct driver for video processing.  In this case you will need to update the driver manually as well as increase the amount of video ram assigned to the VM.


  1. First off you’ll need your VM to be running the latest VMware Tools and be on VM Hardware version 7.
  2. Start by shutting the VM down. Edit the settings of the VM and ensure its Video RAM setting is set between 8MB and 32MB of memory.
  3. After applying the Video RAM setting, start the VM up again, login to Windows and open up the Device Manager.
  4. Expand the “Display Adapters” tree item and right-click your existing Video driver (this should be called “VMware SVGA II”) – select “Update Driver Software”.
  5. Browse for the driver and navigate to the ‘C:\Program Files\Common Files\VMware\drivers\wddm_video’ folder. Complete the wizard and you should end up with a driver labeled as “VMware SVGA 3D (Microsoft Corporation – WDDM)” being installed.
  6. Restart your VM when prompted.
  7. Once you are back in Windows check your Device Manager to ensure you now have the correct driver installed. It should now look like this:


  1. Another point worth noting is that VMware state a minimum of 8MB of Video RAM is required when using this driver, however they recommend 32MB for best performance.


According to VMware KB article 1016770 the WDDM driver is installed by default with Windows 7. However with Windows Server 2008, 2008 R2 and Vista, it is not installed by default but still supported.

Prepare VM for cloning without activating

Active a server 2008 VM

Install WAIK, run Windows System Image Manager

Load Server 2008 R2 DVD/Image – first of all extract the Windows Server/7/Vista ISO file or insert the DVD and browse to the location of the installation files when prompted after loading WAIK and creating a new catalog.

Create a new Distribution Share (right-click, select, then browse to the extracted files).

Right click under Answer File and create a new answer file.

From the Catalogs window drag amd64_Microsoft-Windows-Security-SPP_neutral under 3 – Generalize.

Make any other changes required for customisation, but the important one to avoid re-activation is:

3 generalize

  • amd64_Microsoft-Windows-Security-SPP_neutral
    • SkipRearm = 1

In Windows 7 this appears as :

  • amd64_Microsoft-Windows-Security-SPP_6.1.7601.17514_neutral


Place the newly created unattend.xml in c:\windows\system32\sysprep in the VM


On the VM when it is ready for sysprep run:

cd c:\windows\system32\sysprep\
 sysprep /generalize /oobe /shutdown /unattend:c:\windows\system32\sysprep\unattend.xml

Shutdown the server – do not restart.  It is now ready to be copied.

If you do accidentally start it up in the future, just re-copy the unattend.xml and rerun the sysprep command.


01. April 2011 · Write a comment · Categories: Computers · Tags: ,

I was trying to install ESXi on my desktop machine but the installer appears to hang at the press F10 to continue. Turns out it is to do with the ps2 keyboard – simply plug a USB one in at key press prompt and continue installation 🙂